


Mom's Legendary Fruit Leather
Three ways to create this sun-dried family treasure: from traditional methods to modern adaptations

The Dinner Bell is a love letter to food, family, and memory. It's where I share heritage recipes, revive forgotten dishes, and pair them with stories and sips from my California kitchen. I recreate the original, zhuzh up the flavor when needed, and offer adaptations for how we eat today, so don't miss a bite. Subscribe and join me at the table every week.
Also, this week's post is free for all in honor of Mother’s Day and Mental Health Awareness Month - because playing with your food is good for you!


Happy Mother's Day to all mothers of human and furry creatures.
As I mentioned in Friday's post, we celebrated my mom's 83rd Birthday on Thursday. Now, we're honoring Mother's Day for all the mothers in our lives, including my sisters Julie and Jackie, who are moms to both human and furry children.
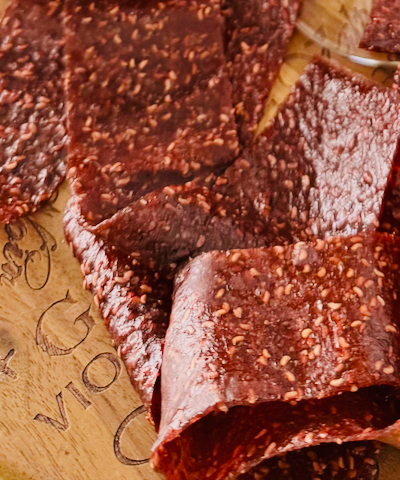
This post is a special tribute to my mom, whose Fruit Leather recipe has achieved legendary status, at least within our family and friend circle.
It's a traditional, sun-dried recipe from a handwritten card so full of instructions that the final steps couldn't fit! Thankfully, Mom is still here to tell me the missing words were simply "let it cool," but you know how it is with these recipe boxes. So many cherished recipes still need their creator standing beside you, guiding you through the unwritten details. You're left to improvise and hope for the best.
I'm incredibly grateful that Mom is still here to share these moments. Today, we celebrate all the mothers in our lives as we gather for brunch, enjoying strips of her famous fruit leather for dessert—a sweet tradition that connects generations.
Stay tuned for those who enjoyed last Sunday's post about Mary Lou's Ice Cream; I'll share an update on my ice cream maker experiment at the end!

The Making of Fruit Leather
It took some doing to perfect this leather. Through trial and error, I discovered that fruit leather requires both technique and patience—something Mom knew all along. I experimented with multiple methods, varying the equipment, preparation surfaces, and drying times to find what worked best.
Without access to a dehydrator (which would have simplified the process considerably), I relied on traditional methods that taught me the value of slow food and careful attention. Here's what I learned along the way:
Mom's Original Sun-Dried Method:
Cook your fruit with sweetener in a pan until soft, blend until smooth, then pour onto a half-sheet pan lined with plastic wrap. The magic happens as you let nature do the work, drying in the direct sun for 12-24 hours, depending on humidity and temperature. This method connects us to how preservation was done for generations before electric appliances.
Oven Method with Parchment:
Skip the cooking step and blend raw fruit with a sweetener. Pour the mixture onto a parchment-lined jelly roll pan and dry in a low oven (170°F) for about 12 hours. I discovered that the smaller pan created a thicker layer of fruit, which extended the drying time but resulted in a chewier leather.
Vitamix Warm-Blend Technique:
Using Vitamix's ability to heat through friction, blend the ingredients on high speed until the mixture warms naturally. Pour onto a Silpat-lined baking sheet and dry in the oven at an even lower temperature (145°F) for approximately 18 hours. This method preserved more of the vibrant flavor while creating a perfect texture.
Ironically, on the very day I planned to follow Mom's traditional sun-drying method, our desert forecast betrayed me! A surprise wind and rain system moved in, dramatically dropping our temperatures and making outdoor drying impossible. Mother Nature herself seemed to be pushing me toward modern adaptations. Despite this meteorological curveball, I still wanted to honor the essence of Mom's approach while finding workable alternatives.
After all this experimentation (and weather-induced improvisation), I've come to appreciate Mom's intuitive approach even more. While each method produced delicious results, there's something special about a family recipe that has stood the test of time, even when the elements don't cooperate! So now, I'm happy to share Mom's original fruit leather recipe with you, complete with those missing words that once had me guessing!

I created three delicious variations, two born from necessity (rescuing fruit that was on its way out) and one from pure market-inspired inspiration:
• Strawberry-Raspberry: A classic combination with bright, tangy notes
• Blueberry-Blackberry with Lemon Lavender Syrup: An elegant, aromatic twist
• Plum & Honey: Sweet, slightly tart, and beautifully intense when concentrated
Of course, you can make any variation of fruit and sweetener that appeals to you. While the process is straightforward, patience is required while waiting for the dehydration to complete. This food-making adventure should be all about fun and play, embracing the creative process just as much as the delicious result.
The finished leather makes a fantastic snack for kids, hikers, health enthusiasts, and even four-legged friends. My German Shepherd, Archie, gives it his enthusiastic approval! 🐾


Mom's Legendary Fruit Leather
Yield: One half-sheet pan makes about 6 servings. To make a larger batch, line up multiple sheets in your oven or on the patio.
Equipment
Blender or food processor (Vitamix works wonderfully)
Chinois cone-shaped sieve (optional for seed removal)
Half-sheet pan (18x13-inch)
Ingredients
Choose one flavor variation:
Strawberry-Raspberry Blend
3 cups strawberries, hulled and chopped
2 cups fresh raspberries
1/4 cup granulated sugar
Blueberry-Blackberry with Lemon Lavender Syrup
3 cups fresh blackberries
2 cups fresh blueberries
6 tablespoons lemon lavender syrup (recipe in Friday's Pairings & Pours)
Plum & Honey
5 cups fresh plums, pitted and chopped
1 tablespoon honey
Instructions
Position your oven rack in the middle position and preheat to 145°F (63°C).
Line an 18×13-inch half-sheet pan with a Silpat baking mat, ensuring it lies completely flat.
Prepare your fruit: wash thoroughly and cut larger fruits (strawberries, plums) into smaller, even pieces.
Place your chosen fruit and sweetener in a blender and purée until completely smooth.
Increase the blender speed to high and blend for an additional minute to gently warm the purée (this helps jumpstart the drying process).
Optional step for seed-free leather: If you prefer a smoother texture, strain the purée through a chinois or fine-mesh sieve to remove seeds.
Pour the fruit purée onto the prepared baking sheet and use an offset spatula to spread it evenly into a thin layer (about ⅛-inch thick).
Place in the preheated oven and allow to dry for approximately 18 hours or until the surface is no longer tacky when gently touched.
Remove the leather from the oven and let it cool completely (here are those missing words from Mom's recipe card!).
Place a sheet of parchment paper on top of the cooled leather. Carefully flip the entire sheet over, then peel away the Silpat.
Roll up the fruit leather in its parchment paper, then slice into strips of desired width.


Storage: Store your finished fruit leather between layers of parchment paper in an airtight container at room temperature for up to 2 weeks, or refrigerate for extended storage.
Special Diet: This recipe is naturally gluten and dairy-free. It can be made without added sugar using very ripe fruit, pitted dates, or a touch of honey.
Serving Suggestion: Roll up fruit leather strips for lunch boxes, cut into fun shapes with cookie cutters for kids, or layer between homemade granola for a breakfast parfait.

What's a Mother's Day celebration without the perfect beverage complementing these delightful fruit leathers? From sparkling wines to rose water lemonades, teas, rum, and Japanese whisky, you'll find the ideal match to elevate your snacking experience!
Missed Friday's complete pairing guide? View it here →
While fruit leather preserves summer's bounty in chewy, vibrant strips, ice cream captures it in cool, creamy spoonfuls. Speaking of frozen treats...

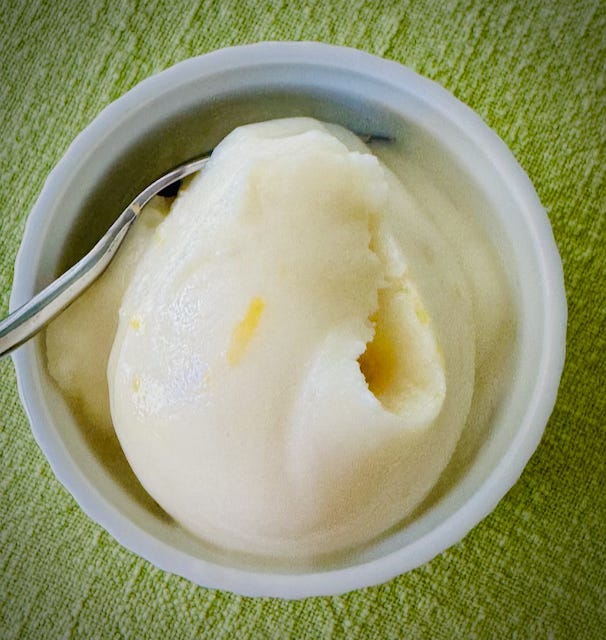
Modern Ice Cream Maker vs. Old-Fashioned Freezer
As promised in last Sunday's post, I experimented with Mary Lou's Lemon Ice Cream recipe using an ice cream maker instead of the freezer method. The original freezer method took about 8 hours, not to make ice cream but to periodically break up ice crystals and achieve a firmer consistency.
To my surprise, the ice cream maker wasn't much help in the final freezing process. Perhaps the scorching 106°F weather today worked against me? The mixture looked promising while churning, but when I removed it from the bowl, it melted quickly. It's now in the freezer for another few hours, following a path similar to the original recipe after all.
The Cuisinart experiment reinforced what I learned from the original freezer method: that this particular family recipe creates a deliciously loose, soft-serve consistency regardless of technique. The lemon flavor remains perfectly bright and refreshing, making it a true summer treat, though definitely one that belongs in a bowl rather than perched on a cone.
The best news? I didn't have to break up ice crystals every hour for 8 hours, so the machine did help advance the recipe to a point where it could simply be frozen for future enjoyment. The ice cream maker handled the initial chilling and crystallization, eliminating the most labor-intensive part of the process.
While I was hoping the ice cream maker would produce a firmer texture right away, the authentic flavor is undeniable. Sometimes family recipes have their own personality that persists regardless of modern interventions. Perhaps Mary Lou intended for this to be enjoyed as a softer dessert all along.
The lesson? Sometimes old-fashioned methods exist for a reason, and Mary Lou's handwritten recipe card knew exactly what it was doing all along!
I have a couple more ice cream recipes lined up for the coming weeks, so we'll continue testing the debate on modern vs. traditional methods. Stay tuned for more frozen adventures, especially now that we’ve hit the 100-plus degree marker in the desert—it feels like summer!

Did you enjoy this fruit leather adventure? Have you created fruit leather before?
Do you have family recipes you've preserved (or deserve to be preserved)?
I'd love to hear your stories! Connect with me in the comments or find me on Instagram @jenniferannblair.
Hungry for more recipes, stories, and pairings? Subscribe today.
This post contains affiliate links